User guide
Everything in Flowizard, explained
From your first recording to a polished exported document — this page covers every button, tool, and shortcut in the app.
 Getting started
Flowizard is a single portable file — there's nothing to install. Download Flowizard.exe, double-click it, and the main window opens. The first time, Windows SmartScreen may ask you to confirm: click More info → Run anyway (see the FAQ for why).
The fastest possible workflow:
- Press ● Start recording.
- Perform the task you want to document, exactly as you normally would.
- Press F10 to stop.
- Tidy up the steps, then press Export Word or Export PDF.
That's genuinely all that's required — everything below is about doing it with more control and polish.
The main window
The window has three areas: a toolbar across the top, the step list on the left, and the step editor (with the annotation canvas) on the right. A status bar along the bottom tells you what Flowizard is doing.
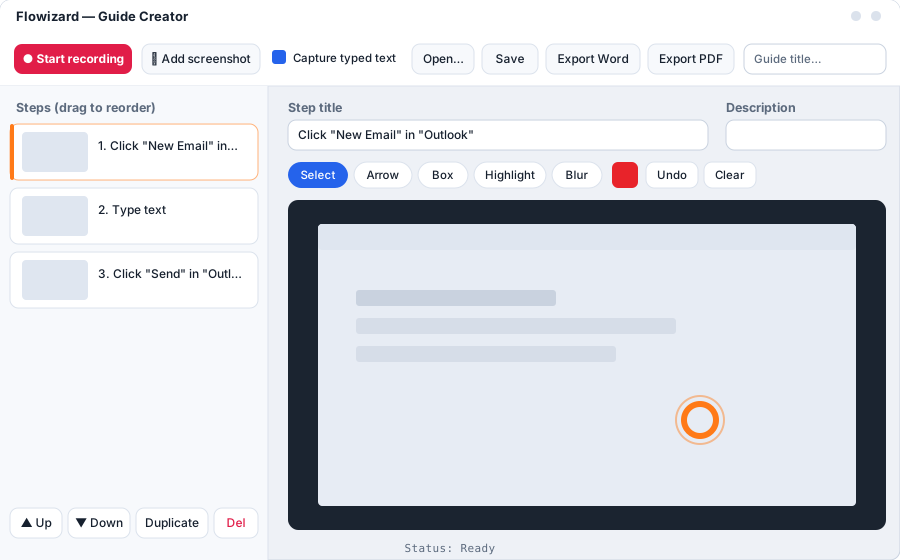
Top toolbar buttons
Left to right, here is what each control does:
Hides the main window and begins capturing. From this moment, every mouse click becomes a numbered step with a screenshot, and typed text is captured as its own steps (if enabled). A small floating REC toolbar appears in the top-right of your screen.
Get the target app on screen before you press record — the very first click is already step 1.Adds a manual step outside of recording. Flowizard hides its own window, waits 3 seconds (so you can bring up what you want captured), then grabs the full screen and appends it as a new step.
Perfect for adding a "here's the finished result" step at the end of a guide.When ticked (the default), text you type during recording is grouped into "Type text" steps — e.g. Type: "Quarterly report attached" — with a screenshot for context. Untick it to record clicks only.
Password fields are always masked automatically, whether this is on or off — see Recording.Opens a saved Flowizard project (.fwproj file) so you can keep editing a guide you saved earlier. Shortcut: Ctrl+O.
Saves your work as a .fwproj project file — steps, titles, descriptions, and all annotations, fully editable later. Shortcut: Ctrl+S.
Produces a finished .docx document: your guide title as the heading, a meta line, then each step as "Step N: title" with its description and annotated screenshot, sized to fit the page.
Produces the same guide as a PDF (US-letter layout). Each step is kept together on the page rather than being split across a page break.
After either export, Flowizard offers to open the file straight away.The text box at the right end of the toolbar. Whatever you type here becomes the document title on export and the project title on save.
Recording a guide
While recording, the main window stays hidden and this floating toolbar is your control panel. It's always on top, appears in the top-right corner, and you can drag it anywhere by its label. Clicks on the toolbar are never recorded as steps.
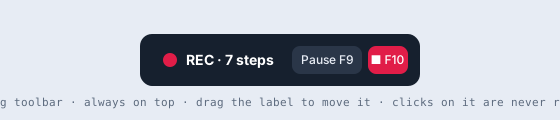
Live counter showing how many steps have been captured so far. It's also the drag handle — hold and drag it to move the toolbar out of your way.
Temporarily stops capturing without ending the session. Clicks and typing while paused are ignored. Press again to resume.
Pause before entering anything you don't want in the guide, then resume.Ends the recording, brings the main window back, and loads all captured steps into the step list, ready for editing. F9 and F10 work even while you're paused.
What gets captured
Clicks. Each left, right, or middle click produces one step: a screenshot of the monitor you clicked on, an orange ring marking the exact click point, and an automatic title naming what you clicked — e.g. Click "Send" in "Outlook" or Right-click "Report.xlsx" in "File Explorer". Flowizard reads the element name through Windows' built-in accessibility system, entirely on your PC.
Typing. With "Capture typed text" on, your keystrokes are grouped into a single step when you press Enter or Tab, or when your next click occurs — titled Type text with the typed content in the description.
••••••••). The real characters are never stored — not even how many there were.
The step list
The left pane shows every step in order, with a thumbnail and its number and title. Click a step to load it into the editor on the right. Four buttons sit at the bottom of the pane:
The quickest way to reorder: press and hold a step, drag it up or down the list, release. Numbering updates instantly.
Move the selected step one position at a time — handy for precise, keyboard-free nudges.
Inserts a copy of the selected step (screenshot, title, description, and annotations included) right below it. Useful when two steps happen on the same screen.
Removes the selected step. Shortcut: Delete (only when you're not typing in a text field, so it can't fire by accident).
Recorded a stray click? Just select it and delete — the rest renumber themselves. Editing a step
The single-line box at the top of the editor. Auto-generated titles are good, but you can rewrite them in your own words — changes save into the step as you type.
The larger text area below the title. Add context, warnings, or details ("Use your network login, not your email address"). Descriptions appear under the step heading in Word and PDF exports.
Annotation tools
The row of tool buttons above the preview canvas lets you draw directly on a step's screenshot. Annotations are non-destructive: the original screenshot is always kept untouched underneath, so you can undo or clear at any time — with one deliberate exception (Blur, below).
The neutral tool — with it active, clicking the canvas doesn't draw anything. It has one special power: drag the orange click marker to reposition it if the recorded click point isn't quite where you want the reader to look. The cursor becomes a hand when you hover over the marker.
Drag from tail to tip to draw an arrow in the current color. Great for "click here, then look there".
Drag to draw a rectangle outline around anything you want to call out.
Drag to lay a translucent yellow highlight over a region — like a marker pen over text.
Drag over anything sensitive — names, emails, account numbers — to pixelate it. In the app you can still undo a blur, but in the exported document the blurred pixels are genuinely destroyed: they can't be recovered or "un-blurred" by anyone you share the file with.
Zoom your target app before recording so blurred regions can be drawn precisely.Opens a color picker for arrows and boxes. The default is a strong red; pick anything that stands out against your screenshots.
Removes the most recent annotation on the current step. Shortcut: Ctrl+Z (ignored while you're typing in a text box). The recorded click marker is protected — undo never removes it.
Removes all your drawings from the current step in one go, keeping the click marker.
Drawing works the same for every tool: choose the tool, then click-drag on the preview. You'll see the shape live while dragging; release to commit it. Tiny accidental drags (a few pixels) are ignored. Annotations are stored in the screenshot's real resolution, so they stay razor-sharp in exports even on 4K captures.
Saving & exporting
Flowizard makes a clear distinction between the two:
| Project (.fwproj) | Export (Word / PDF) | |
|---|---|---|
| Purpose | Keep working later | Share the finished guide |
| Editable | Yes — everything, including annotations | No (it's a normal document) |
| Image quality | Lossless originals | High-quality compressed (crisp, small files) |
| How | Save / Ctrl+S, Open… / Ctrl+O | Export Word / Export PDF buttons |
If you try to close Flowizard with unsaved changes, it asks whether you want to save first.
Keyboard shortcuts
| Shortcut | Action | When it works |
|---|---|---|
| F9 | Pause / resume recording | While recording (even when paused) |
| F10 | Stop recording | While recording (even when paused) |
| Ctrl+S | Save project | In the editor |
| Ctrl+O | Open project | In the editor |
| Delete | Delete selected step | In the editor, when not typing in a text field |
| Ctrl+Z | Undo last annotation | In the editor, when not typing in a text field |
Tips & troubleshooting
Get better recordings
Rehearse the task once before recording — fewer stray clicks means less cleanup. Close unrelated windows, and drag the REC toolbar to a corner where it won't overlap what you're demonstrating (it does appear in screenshots, small and in the top-right by default). Use F9 liberally: pause whenever you need to do something that shouldn't be in the guide.
A step title just says "Click" or only names the window
Some applications don't expose accessibility names for their buttons, and clicks on the bare desktop have no element to name. The screenshot and marker are still captured — just type your own title. In Chrome, Edge, and similar apps, the very first click of a session can occasionally miss the element name while the browser wakes up its accessibility layer; subsequent clicks name correctly.
Typed text became several steps
A typing step is finalized whenever you press Enter or Tab or click somewhere — so filling three form fields correctly produces three "Type" steps. If you want them merged, delete the extras and fold the text into one step's description.
Exported images look softer than my screen
Exports use high-quality compression tuned for screenshots, and captures are taken at your monitor's native resolution — text should look crisp. If your guide will be read on very high-density displays, prefer PDF, which preserves image sizing precisely.
Was this guide useful?
Flowizard and this documentation are free. If they saved you time, consider buying the developer a coffee.